Introduction
Rook is a CNCF open-source project built to deliver storage solutions for Kubernetes. Leveraging battle-tested open-source storage technologies, including Ceph, it has years of production deployments and runs some of the world’s largest clusters. Rook is available under Apache 2.0 license.
Containers are ephemeral by nature. Without a persistent storage solution, data is lost as containers die. Persistent data solutions, accessible by Kubernetes, safeguard against this type of data loss while delivering the scale, performance, and availability required by large data stores in cloud native environments.
Rook enables the build of dedicated storage clusters and hyper-converged clusters to allow apps to run alongside storage. The solution integrates Ceph with multiple storage presentations, including object storage (compatible with S3 and swift), block storage, and POSIX-compliant shared file system.
Rook efficiently distributes and replicates data across clusters to minimize the risk of data loss. Secure storage of cluster data is supported by snapshots, cloning, and versioning.
Rook’s persistent storage for containers solution easily integrates with the Nirmata platform. Read on to learn how to integrate Rook with the Nirmata platform and provision highly available replicated storage.
Prerequesisites
- Nirmata Cluster with Kubernetes 1.7+, minimum 3 nodes in a cluster. The example that follows uses Kubernetes version 1.9.4 with 4 nodes.
- Flex Volume Configuration: Enabled by default with Nirmata (Directory: “/opt/nirmata/volume-plugins”)
- kubectl: 1.9+ (for setting rook cluster)
- dataDirHostPath Storage: Path on VM node(host) to store config and data for rook services (enough to meet container persistent storage requirements); default is /var/lib/rook
- Linux packages: rbd-fuse, ceph-fs-common
Install Linux Packages
To install Linux packages, run the following two (2) commands on Ubuntu. Run each command as root (or sudo) on each node VM.
apt-get install rbd-fuse
apt-get install ceph-fs-common
Setup a Kubernetes Cluster through Nirmata
- Setup Cloud-provider.
- Setup container Hostgroup.
- Setup Kubernetes Cluster.
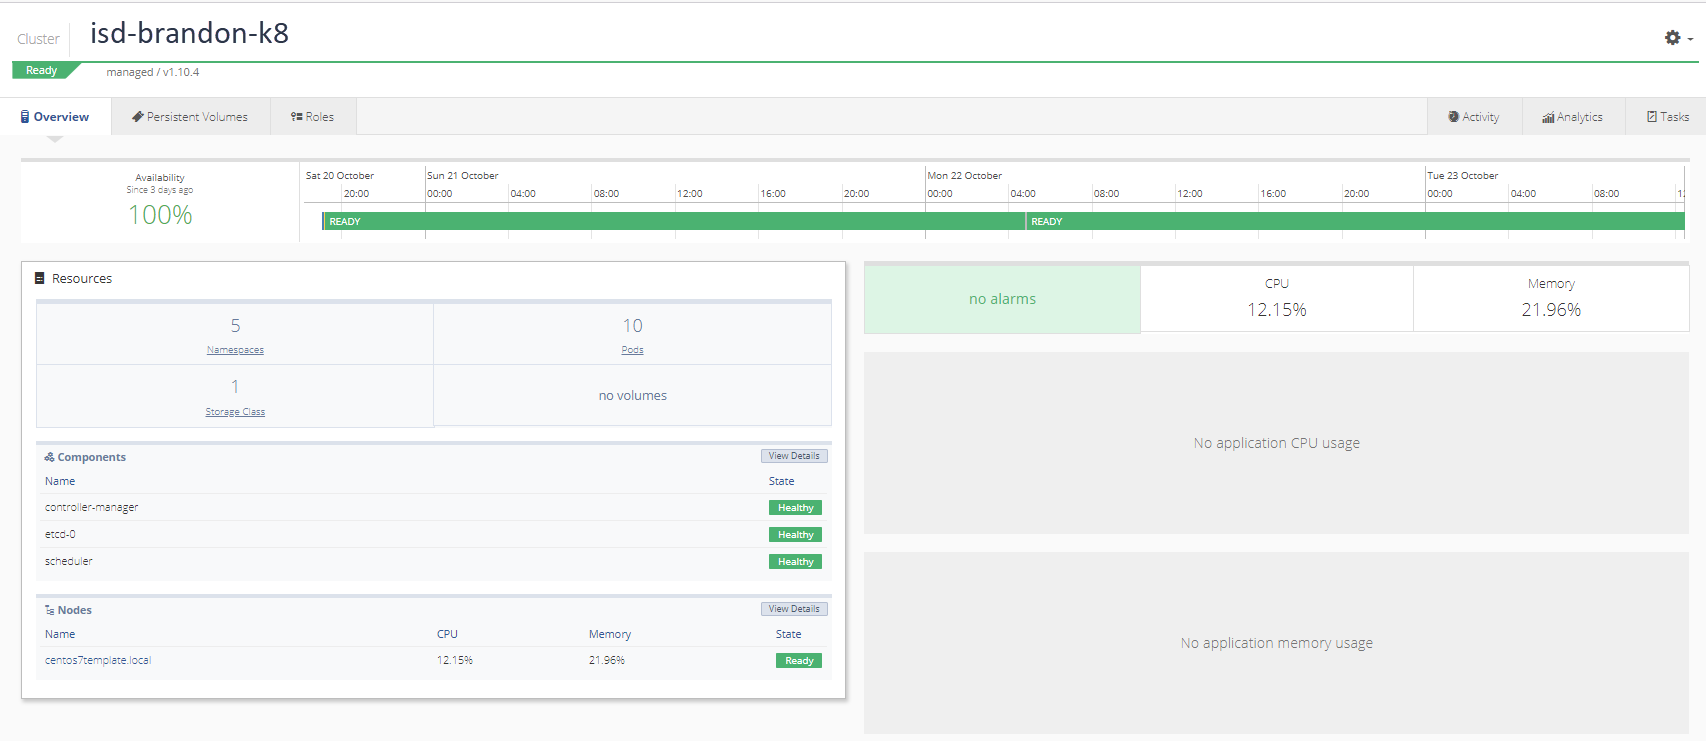
When setup is complete, the Kubernetes cluster will display:
Configure and Deploy Operator YAML
Nirmata v2.1.0 requires configuration changes to the operator.yaml file.
**Note: The full YAML file is available here: operator.yaml
Modify the Following Parameters in operator.yaml
Allow use of extensions in place of apps.
apiVersion: extension/v1beta1
`kind: Deployment
Configure a flex-volume path for ceph volume-plugins.
- name: FLEXVOLUME_DIR_PATH
value: "/opt/nirmata/volume-plugins/"
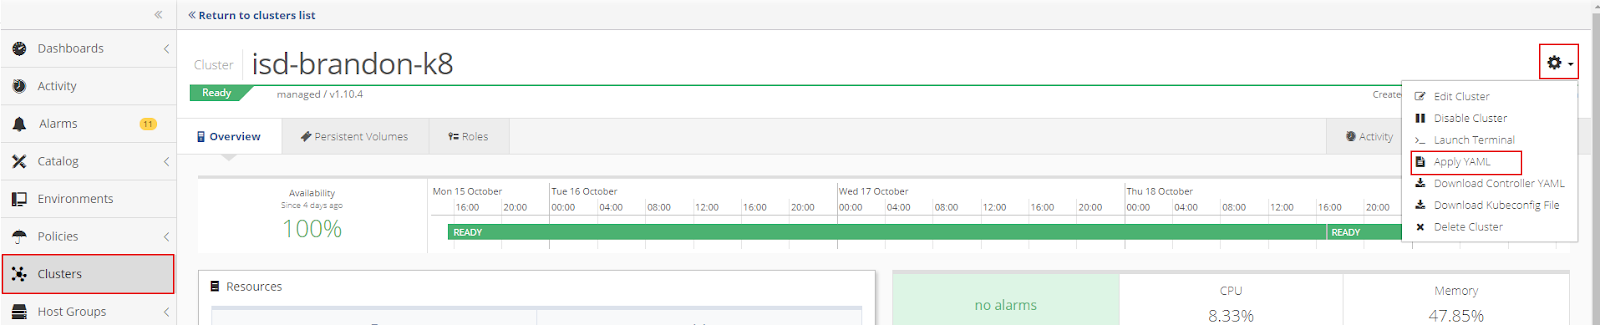
When changes are complete, apply operator.yaml to the cluster.
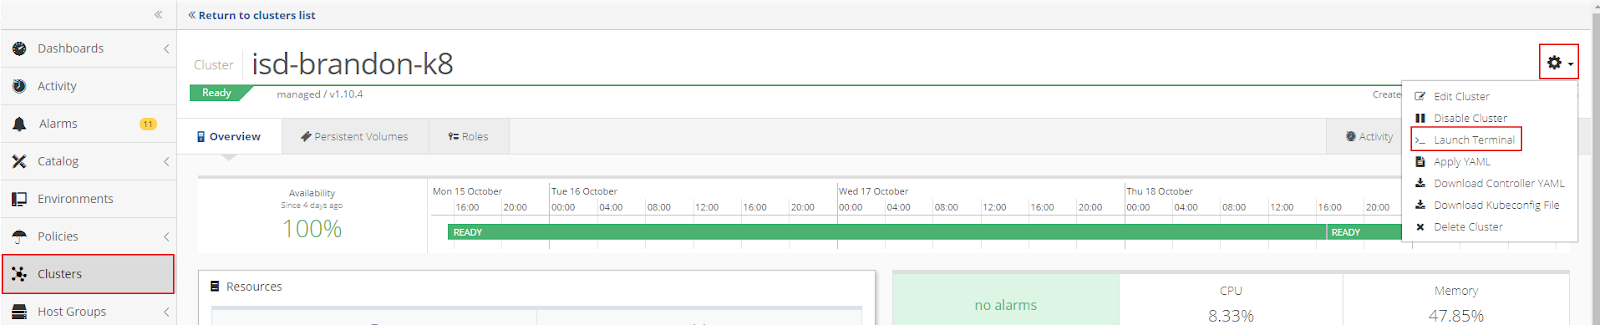
Click the gear in the top right corner of the Cluster window to open the Cluster Settings menu. Then select Apply YAML.
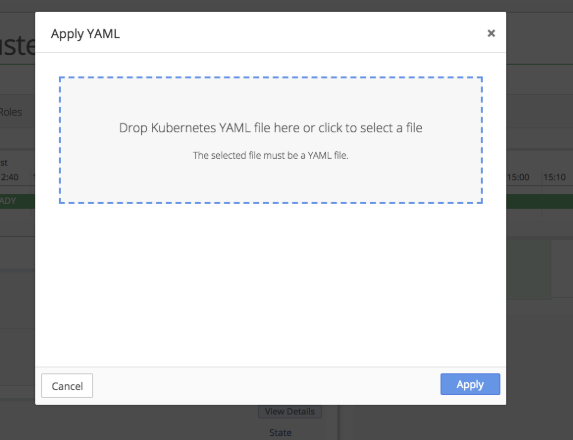
Drop the operator.yaml file into the upload box or select the file from the directory.
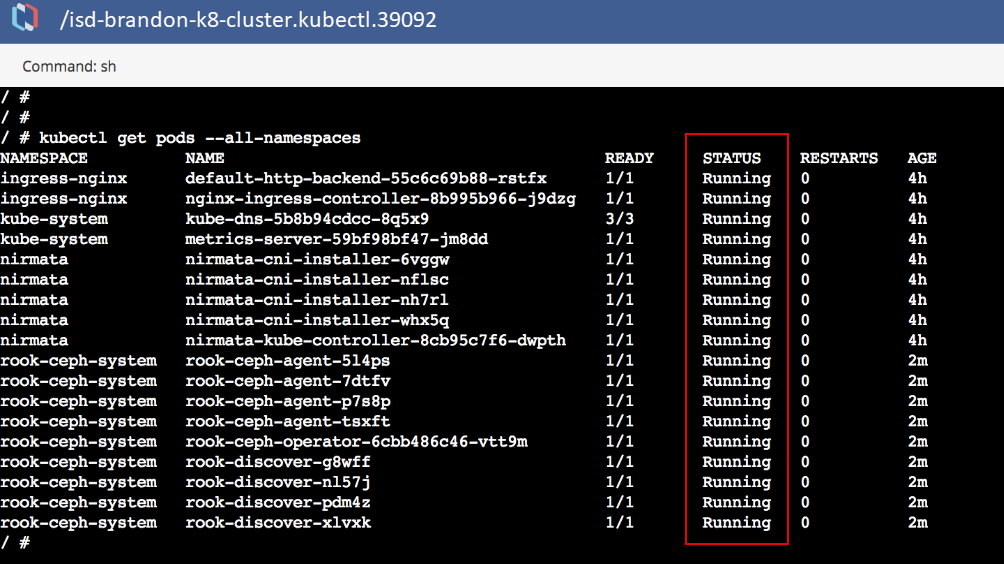
From the Cluster Settings menu, select Launch Terminal to run a Kubectl command to verify that the operator, discover, and agent pods are up and running.

If properly configured, the Kubectl command will report that all pods are running.
Configure and Deploy cluster.yaml
To deploy the cluster in Nirmata, modify cluster.yaml. The modified cluster.yaml installs in the roo-ceph namespace.
All applications in Nirmata are deployed in an Environment.
At the application isolation level, the namespace is: applicationname-environmentname
A shared namespace within an environment is: environmentname
In this example, cluster.yaml is deployed as an application in a rook-ceph environment.
To start, create a “rook-ceph” environment with a shared namespace at the application isolation level.
Click +Add Application and then complete the information in the pop-up window and click Add.
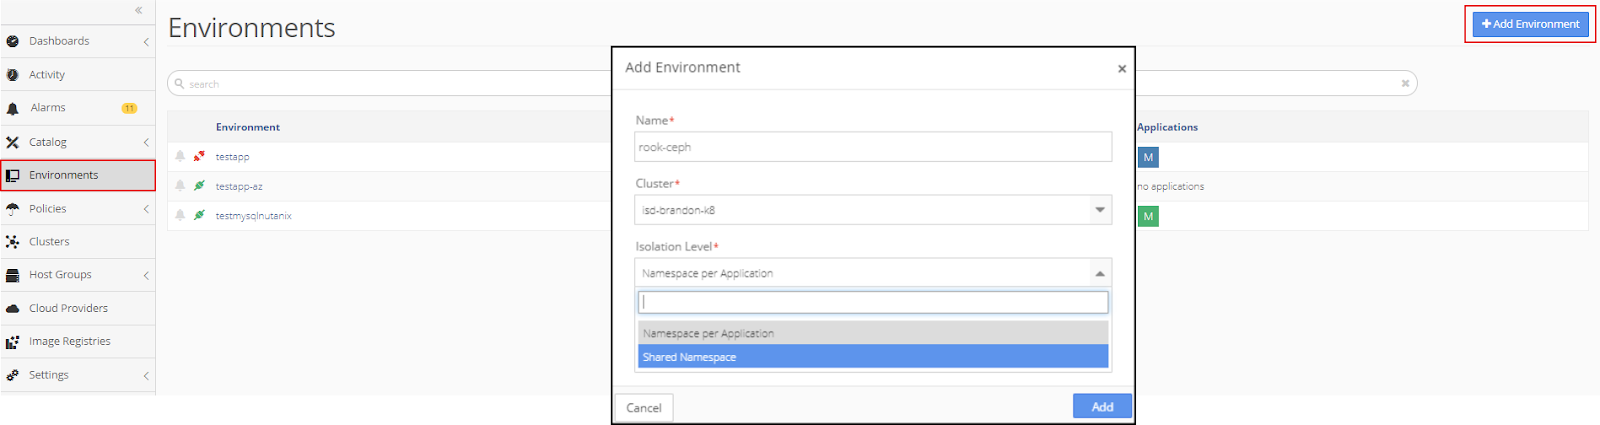
The new rook-ceph environment appears in the Environments menu.

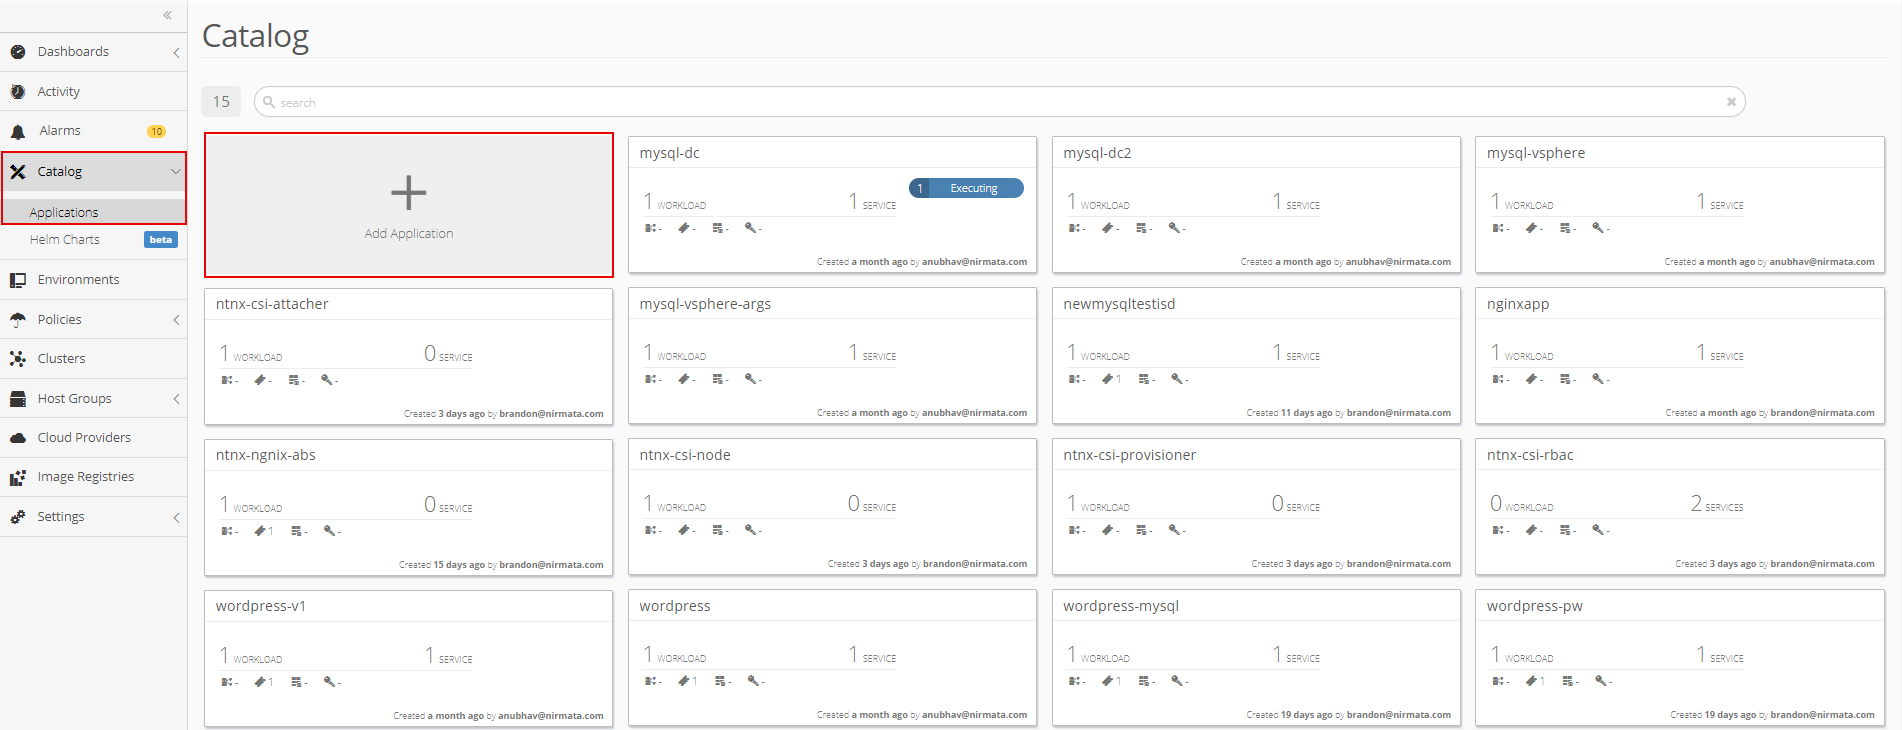
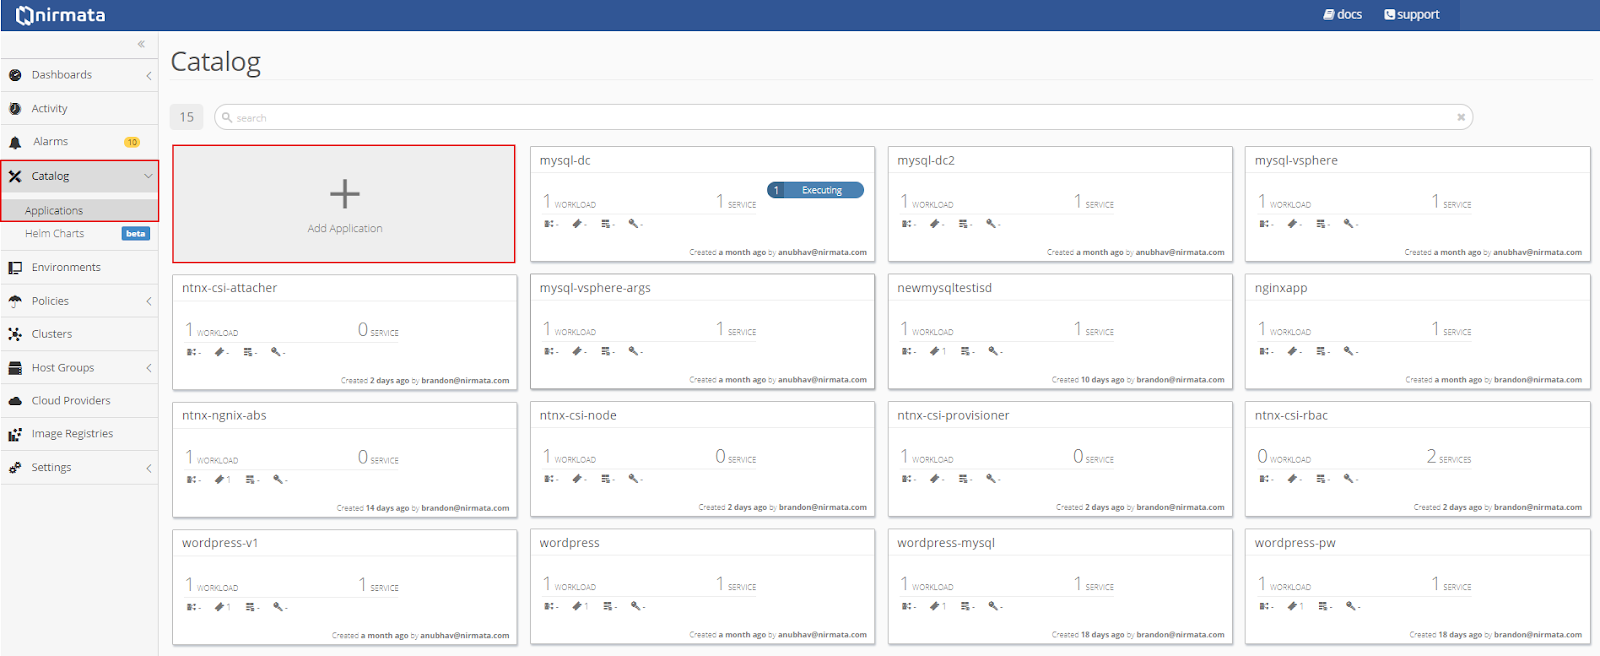
Next, create a new a “rook-cluster” application in the Application Catalog.
To create a new application, click on Catalog in the sidebar menu and then select Application Catalog. From the main Application Catalog screen, click Add Application.
Add the following YAML file to create the rook-cluster application:
apiVersion: ceph.rook.io/v1beta1
kind: Cluster
metadata:
  name: rook-ceph
spec:
  dataDirHostPath: /var/lib/rook
  # The service account under which to run the daemon pods in this cluster if the default account is not sufficient (OSDs)
  serviceAccount: rook-ceph-cluster
  # set the amount of mons to be started
  mon:
    count: 3
    allowMultiplePerNode: true
  # enable the ceph dashboard for viewing cluster status
  dashboard:
    enabled: true
  network:
    # toggle to use hostNetwork
    hostNetwork: false
# The requests and limits set here, allow the mgr pod to use half of one CPU core and 1 gigabyte of memory
#    mgr:
#      limits:
#        cpu: "500m"
#        memory: "1024Mi"
#      requests:
#        cpu: "500m"
#        memory: "1024Mi"
# The above example requests/limits can also be added to the mon and osd components
#    mon:
#    osd:
  storage: # cluster level storage configuration and selection
    useAllNodes: true
    useAllDevices: false
    deviceFilter:
    location:
    config:
      # The default and recommended storeType is dynamically set to bluestore for devices and filestore for directories.
      # Set the storeType explicitly only if it is required not to use the default.
      # storeType: bluestore
      databaseSizeMB: "1024" # this value can be removed for environments with normal sized disks (100 GB or larger)
      journalSizeMB: "1024"  # this value can be removed for environments with normal sized disks (20 GB or larger)
# Cluster level list of directories to use for storage. These values will be set for all nodes that have no `directories` set.
#    directories:
#    - path: /rook/storage-dir
# Individual nodes and their config can be specified as well, but 'useAllNodes' above must be set to false. Then, only the named
# nodes below will be used as storage resources.  Each node's 'name' field should match their 'kubernetes.io/hostname' label.
#    nodes:
#    - name: "172.17.4.101"
#      directories: # specific directories to use for storage can be specified for each node
#      - path: "/rook/storage-dir"
#      resources:
#        limits:
#          cpu: "500m"
#          memory: "1024Mi"
#        requests:
#          cpu: "500m"
#          memory: "1024Mi"
#    - name: "172.17.4.201"
#      devices: # specific devices to use for storage can be specified for each node
#      - name: "sdb"
#      - name: "sdc"
#      config: # configuration can be specified at the node level which overrides the cluster level config
#        storeType: filestore
#    - name: "172.17.4.301"
#      deviceFilter: "^sd."
Run the cluster application in a rook-ceph environment and apply role-binding.
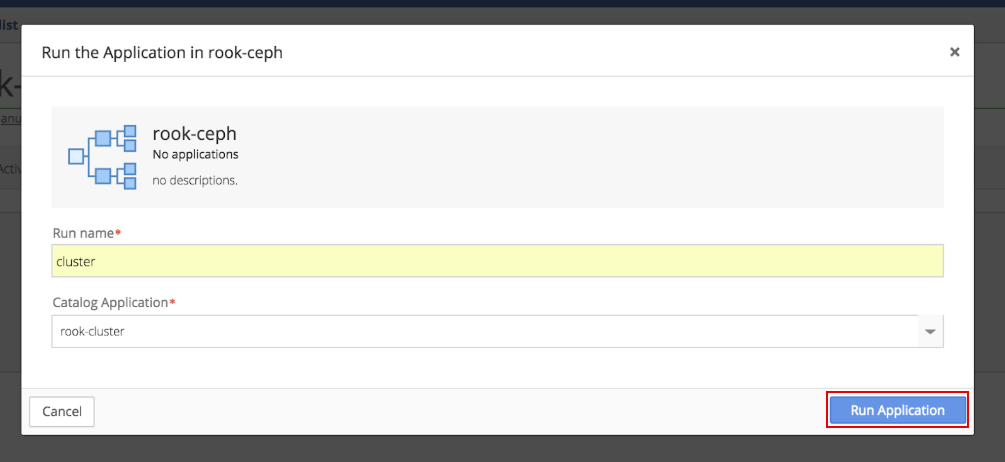
In the Environments menu, open the rook-ceph environment that was just created. Click the gear in the top right corner of the Environments window and select the + Run an Application option.
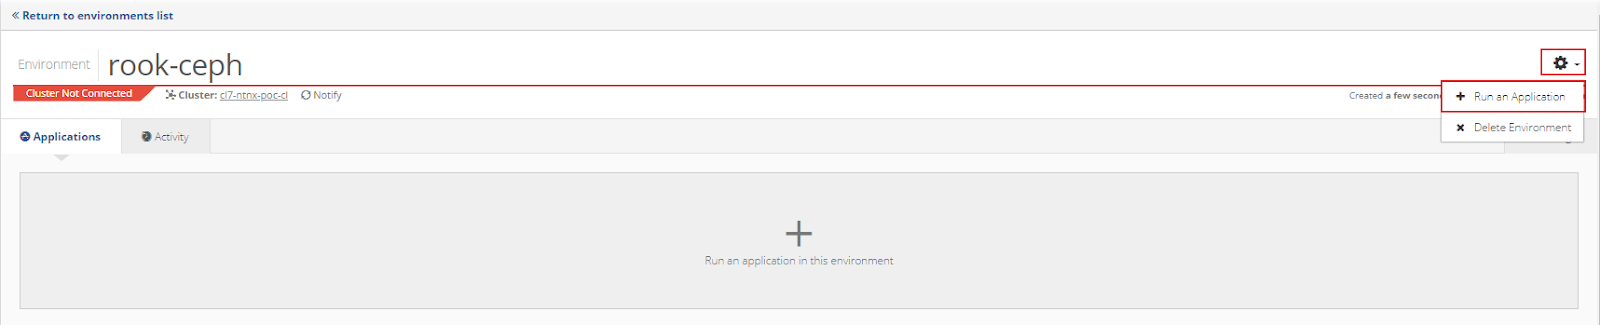
Choose the rook-cluster application and click Run Application.
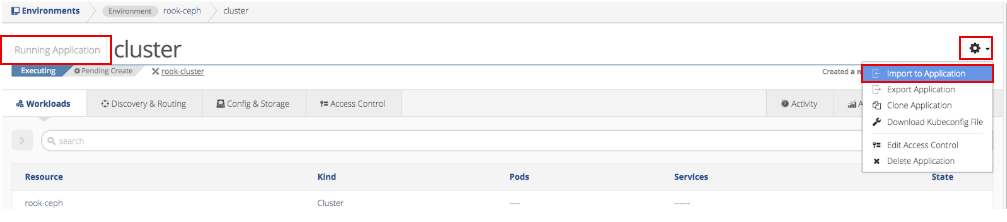
Click the gear in the top right corner of the Running Application window and select the Import to Application option.

Import role-bindings into the application.
A sample YAML for role-binding’s and CRD’s is provided below;
###################################################################################################################
# Create the common resources that are necessary to start the operator and the ceph cluster.
# These resources *must* be created before the operator.yaml and cluster.yaml or their variants.
# The samples all assume that a single operator will manage a single cluster crd in the same "rook-ceph" namespace.
#
# If the operator needs to manage multiple clusters (in different namespaces), see the section below
# for "cluster-specific resources". The resources below that section will need to be created for each namespace
# where the operator needs to manage the cluster. The resources above that section do not be created again.
###################################################################################################################
---
# The CRD declarations
apiVersion: apiextensions.k8s.io/v1beta1
kind: CustomResourceDefinition
metadata:
  name: cephclusters.ceph.rook.io
spec:
  group: ceph.rook.io
  names:
    kind: CephCluster
    listKind: CephClusterList
    plural: cephclusters
    singular: cephcluster
  scope: Namespaced
  version: v1
  validation:
    openAPIV3Schema:
      properties:
        spec:
          properties:
            cephVersion:
              properties:
                allowUnsupported:
                  type: boolean
                image:
                  type: string
                name:
                  pattern: ^(luminous|mimic|nautilus)$
                  type: string
            dashboard:
              properties:
                enabled:
                  type: boolean
                urlPrefix:
                  type: string
                port:
                  type: integer
            dataDirHostPath:
              pattern: ^/(\S+)
              type: string
            mon:
              properties:
                allowMultiplePerNode:
                  type: boolean
                count:
                  maximum: 9
                  minimum: 1
                  type: integer
                preferredCount:
                  maximum: 9
                  minimum: 0
                  type: integer
              required:
              - count
            network:
              properties:
                hostNetwork:
                  type: boolean
            storage:
              properties:
                nodes:
                  items: {}
                  type: array
                useAllDevices: {}
                useAllNodes:
                  type: boolean
          required:
          - mon
  additionalPrinterColumns:
    - name: DataDirHostPath
      type: string
      description: Directory used on the K8s nodes
      JSONPath: .spec.dataDirHostPath
    - name: MonCount
      type: string
      description: Number of MONs
      JSONPath: .spec.mon.count
    - name: Age
      type: date
      JSONPath: .metadata.creationTimestamp
    - name: State
      type: string
      description: Current State
      JSONPath: .status.state
---
apiVersion: apiextensions.k8s.io/v1beta1
kind: CustomResourceDefinition
metadata:
  name: cephfilesystems.ceph.rook.io
spec:
  group: ceph.rook.io
  names:
    kind: CephFilesystem
    listKind: CephFilesystemList
    plural: cephfilesystems
    singular: cephfilesystem
  scope: Namespaced
  version: v1
  additionalPrinterColumns:
    - name: MdsCount
      type: string
      description: Number of MDSs
      JSONPath: .spec.metadataServer.activeCount
    - name: Age
      type: date
      JSONPath: .metadata.creationTimestamp
---
apiVersion: apiextensions.k8s.io/v1beta1
kind: CustomResourceDefinition
metadata:
  name: cephnfses.ceph.rook.io
spec:
  group: ceph.rook.io
  names:
    kind: CephNFS
    listKind: CephNFSList
    plural: cephnfses
    singular: cephnfs
    shortNames:
    - nfs
  scope: Namespaced
  version: v1
---
apiVersion: apiextensions.k8s.io/v1beta1
kind: CustomResourceDefinition
metadata:
  name: cephobjectstores.ceph.rook.io
spec:
  group: ceph.rook.io
  names:
    kind: CephObjectStore
    listKind: CephObjectStoreList
    plural: cephobjectstores
    singular: cephobjectstore
  scope: Namespaced
  version: v1
---
apiVersion: apiextensions.k8s.io/v1beta1
kind: CustomResourceDefinition
metadata:
  name: cephobjectstoreusers.ceph.rook.io
spec:
  group: ceph.rook.io
  names:
    kind: CephObjectStoreUser
    listKind: CephObjectStoreUserList
    plural: cephobjectstoreusers
    singular: cephobjectstoreuser
  scope: Namespaced
  version: v1
---
apiVersion: apiextensions.k8s.io/v1beta1
kind: CustomResourceDefinition
metadata:
  name: cephblockpools.ceph.rook.io
spec:
  group: ceph.rook.io
  names:
    kind: CephBlockPool
    listKind: CephBlockPoolList
    plural: cephblockpools
    singular: cephblockpool
  scope: Namespaced
  version: v1
---
apiVersion: apiextensions.k8s.io/v1beta1
kind: CustomResourceDefinition
metadata:
  name: volumes.rook.io
spec:
  group: rook.io
  names:
    kind: Volume
    listKind: VolumeList
    plural: volumes
    singular: volume
    shortNames:
    - rv
  scope: Namespaced
  version: v1alpha2
---
# The cluster role for managing all the cluster-specific resources in a namespace
apiVersion: rbac.authorization.k8s.io/v1beta1
kind: ClusterRole
metadata:
  name: rook-ceph-cluster-mgmt
  labels:
    operator: rook
    storage-backend: ceph
rules:
- apiGroups:
  - ""
  resources:
  - secrets
  - pods
  - pods/log
  - services
  - configmaps
  verbs:
  - get
  - list
  - watch
  - patch
  - create
  - update
  - delete
- apiGroups:
  - apps
  resources:
  - deployments
  - daemonsets
  - replicasets
  verbs:
  - get
  - list
  - watch
  - create
  - update
  - delete
---
# The role for the operator to manage resources in its own namespace
apiVersion: rbac.authorization.k8s.io/v1beta1
kind: Role
metadata:
  name: rook-ceph-system
  namespace: rook-ceph
  labels:
    operator: rook
    storage-backend: ceph
rules:
- apiGroups:
  - ""
  resources:
  - pods
  - configmaps
  - services
  verbs:
  - get
  - list
  - watch
  - patch
  - create
  - update
  - delete
- apiGroups:
  - apps
  resources:
  - daemonsets
  - statefulsets
  verbs:
  - get
  - list
  - watch
  - create
  - update
  - delete
---
# The cluster role for managing the Rook CRDs
apiVersion: rbac.authorization.k8s.io/v1beta1
kind: ClusterRole
metadata:
  name: rook-ceph-global
  labels:
    operator: rook
    storage-backend: ceph
rules:
- apiGroups:
  - ""
  resources:
  # Pod access is needed for fencing
  - pods
  # Node access is needed for determining nodes where mons should run
  - nodes
  - nodes/proxy
  verbs:
  - get
  - list
  - watch
- apiGroups:
  - ""
  resources:
  - events
    # PVs and PVCs are managed by the Rook provisioner
  - persistentvolumes
  - persistentvolumeclaims
  - endpoints
  verbs:
  - get
  - list
  - watch
  - patch
  - create
  - update
  - delete
- apiGroups:
  - storage.k8s.io
  resources:
  - storageclasses
  verbs:
  - get
  - list
  - watch
- apiGroups:
  - batch
  resources:
  - jobs
  verbs:
  - get
  - list
  - watch
  - create
  - update
  - delete
- apiGroups:
  - ceph.rook.io
  resources:
  - "*"
  verbs:
  - "*"
- apiGroups:
  - rook.io
  resources:
  - "*"
  verbs:
  - "*"
---
# Aspects of ceph-mgr that require cluster-wide access
kind: ClusterRole
apiVersion: rbac.authorization.k8s.io/v1beta1
metadata:
  name: rook-ceph-mgr-cluster
  labels:
    operator: rook
    storage-backend: ceph
rules:
- apiGroups:
  - ""
  resources:
  - configmaps
  - nodes
  - nodes/proxy
  verbs:
  - get
  - list
  - watch
---
# The rook system service account used by the operator, agent, and discovery pods
apiVersion: v1
kind: ServiceAccount
metadata:
  name: rook-ceph-system
  namespace: rook-ceph
  labels:
    operator: rook
    storage-backend: ceph
---
# Grant the operator, agent, and discovery agents access to resources in the namespace
kind: RoleBinding
apiVersion: rbac.authorization.k8s.io/v1beta1
metadata:
  name: rook-ceph-system
  namespace: rook-ceph
  labels:
    operator: rook
    storage-backend: ceph
roleRef:
  apiGroup: rbac.authorization.k8s.io
  kind: Role
  name: rook-ceph-system
subjects:
- kind: ServiceAccount
  name: rook-ceph-system
  namespace: rook-ceph
---
# Grant the rook system daemons cluster-wide access to manage the Rook CRDs, PVCs, and storage classes
kind: ClusterRoleBinding
apiVersion: rbac.authorization.k8s.io/v1beta1
metadata:
  name: rook-ceph-global
  namespace: rook-ceph
  labels:
    operator: rook
    storage-backend: ceph
roleRef:
  apiGroup: rbac.authorization.k8s.io
  kind: ClusterRole
  name: rook-ceph-global
subjects:
- kind: ServiceAccount
  name: rook-ceph-system
  namespace: rook-ceph
---
#################################################################################################################
# Beginning of cluster-specific resources. The example will assume the cluster will be created in the "rook-ceph"
# namespace. If you want to create the cluster in a different namespace, you will need to modify these roles
# and bindings accordingly.
#################################################################################################################
# Service account for the Ceph OSDs. Must exist and cannot be renamed.
apiVersion: v1
kind: ServiceAccount
metadata:
  name: rook-ceph-osd
  namespace: rook-ceph
---
# Service account for the Ceph Mgr. Must exist and cannot be renamed.
apiVersion: v1
kind: ServiceAccount
metadata:
  name: rook-ceph-mgr
  namespace: rook-ceph
---
kind: Role
apiVersion: rbac.authorization.k8s.io/v1beta1
metadata:
  name: rook-ceph-osd
  namespace: rook-ceph
rules:
- apiGroups: [""]
  resources: ["configmaps"]
  verbs: [ "get", "list", "watch", "create", "update", "delete" ]
---
# Aspects of ceph-mgr that require access to the system namespace
kind: ClusterRole
apiVersion: rbac.authorization.k8s.io/v1beta1
metadata:
  name: rook-ceph-mgr-system
  namespace: rook-ceph
rules:
- apiGroups:
  - ""
  resources:
  - configmaps
  verbs:
  - get
  - list
  - watch
---
# Aspects of ceph-mgr that operate within the cluster's namespace
kind: Role
apiVersion: rbac.authorization.k8s.io/v1beta1
metadata:
  name: rook-ceph-mgr
  namespace: rook-ceph
rules:
- apiGroups:
  - ""
  resources:
  - pods
  - services
  verbs:
  - get
  - list
  - watch
- apiGroups:
  - batch
  resources:
  - jobs
  verbs:
  - get
  - list
  - watch
  - create
  - update
  - delete
- apiGroups:
  - ceph.rook.io
  resources:
  - "*"
  verbs:
  - "*"
---
  # Allow the operator to create resources in this cluster's namespace
kind: RoleBinding
apiVersion: rbac.authorization.k8s.io/v1beta1
metadata:
  name: rook-ceph-cluster-mgmt
  namespace: rook-ceph
roleRef:
  apiGroup: rbac.authorization.k8s.io
  kind: ClusterRole
  name: rook-ceph-cluster-mgmt
subjects:
- kind: ServiceAccount
  name: rook-ceph-system
  namespace: rook-ceph
---
# Allow the osd pods in this namespace to work with configmaps
kind: RoleBinding
apiVersion: rbac.authorization.k8s.io/v1beta1
metadata:
  name: rook-ceph-osd
  namespace: rook-ceph
roleRef:
  apiGroup: rbac.authorization.k8s.io
  kind: Role
  name: rook-ceph-osd
subjects:
- kind: ServiceAccount
  name: rook-ceph-osd
  namespace: rook-ceph
---
# Allow the ceph mgr to access the cluster-specific resources necessary for the mgr modules
kind: RoleBinding
apiVersion: rbac.authorization.k8s.io/v1beta1
metadata:
  name: rook-ceph-mgr
  namespace: rook-ceph
roleRef:
  apiGroup: rbac.authorization.k8s.io
  kind: Role
  name: rook-ceph-mgr
subjects:
- kind: ServiceAccount
  name: rook-ceph-mgr
  namespace: rook-ceph
---
# Allow the ceph mgr to access the rook system resources necessary for the mgr modules
kind: RoleBinding
apiVersion: rbac.authorization.k8s.io/v1beta1
metadata:
  name: rook-ceph-mgr-system
  namespace: rook-ceph
roleRef:
  apiGroup: rbac.authorization.k8s.io
  kind: ClusterRole
  name: rook-ceph-mgr-system
subjects:
- kind: ServiceAccount
  name: rook-ceph-mgr
  namespace: rook-ceph
---
# Allow the ceph mgr to access cluster-wide resources necessary for the mgr modules
kind: ClusterRoleBinding
apiVersion: rbac.authorization.k8s.io/v1beta1
metadata:
  name: rook-ceph-mgr-cluster
roleRef:
  apiGroup: rbac.authorization.k8s.io
  kind: ClusterRole
  name: rook-ceph-mgr-cluster
subjects:
- kind: ServiceAccount
  name: rook-ceph-mgr
  namespace: rook-ceph
---
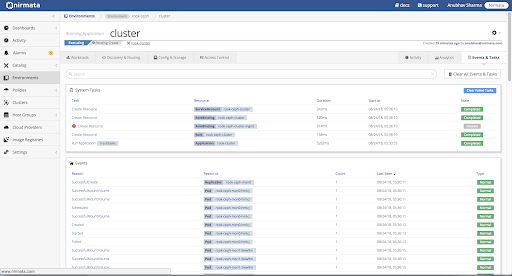
Verify that the mon and mgr pods are deploying.
To verify, check Events and Tasks log or run Kubectl commands from the cluster shell.
To check Events and Tasks, open the Environment and then open the Activity tab.
Verify that all Environment tasks are reporting “Normal.”
Next, verify Application Events by selecting the Application and opening the Activity tab.
Verify that all Application events are reporting “Normal.”
To run Kubectl commands from the cluster shell, open the Nirmata Cluster Settings menu and select Launch Terminal.
If properly configured, the Kubectl command will report that all pods are running.

Setup Storage Class and Replica Pool
To setup a storage-class and replica pool, import the storage-class for block storage.
Storage-Class for Block Storage YAML:
apiVersion: storage.k8s.io/v1
kind: StorageClass
metadata:
   name: rook-ceph-block
provisioner: ceph.rook.io/block
parameters:
  pool: replicapool
  # Specify the namespace of the rook cluster from which to create volumes.
  # If not specified, it will use `rook` as the default namespace of the cluster.
  # This is also the namespace where the cluster will be
  clusterNamespace: rook-ceph
  # Specify the filesystem type of the volume. If not specified, it will use `ext4`.
#  fstype: xfs
Apply storage-class for block storage to the Kubernetes Cluster using the Apply YAML option in the Cluster Settings menu.

Drop the storage-class.yaml file into the upload box or select the file from the directory.

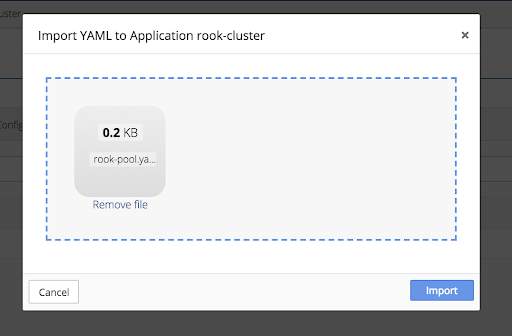
Next, import the replica-pool setting manifest into the Kubernetes Cluster in the rook-ceph Environment.
Replica-Pool YAML Manifest:
apiVersion: ceph.rook.io/v1beta1
kind: Pool
metadata:
  name: replicapool
  namespace: rook-ceph
spec:
  failureDomain: host
  replicated:
    size: 2
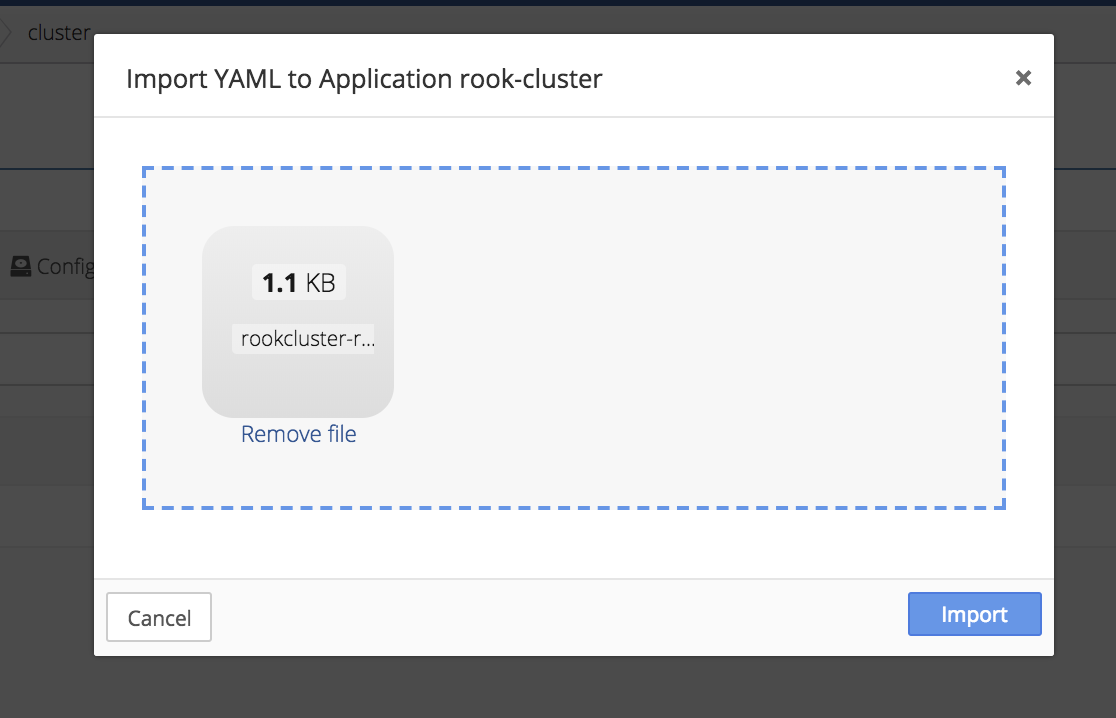
To import the replica-pool setting manifest, click the gear in the top right corner of the Running Application window and select the Import to Application option.
Drop the Replica-Pool YAML Manifest file into the upload box or select the file from the directory.
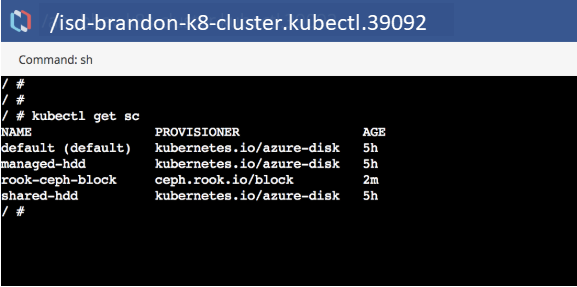
Verify that storage-class is configured on the cluster through the Nirmata shell.
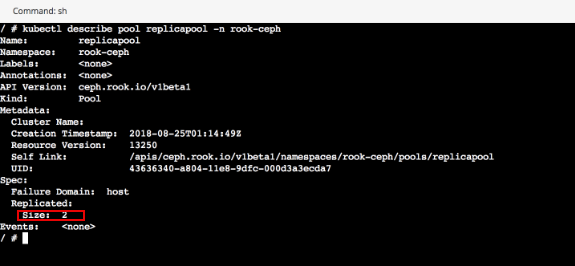
Verify that the pool is set to a replication size of 2.
Create a New Environment and Run the Application
To create a new Environment, select Environment from the sidebar menu. Then click, +Add Application and complete the information in the pop-up window. Click Add.
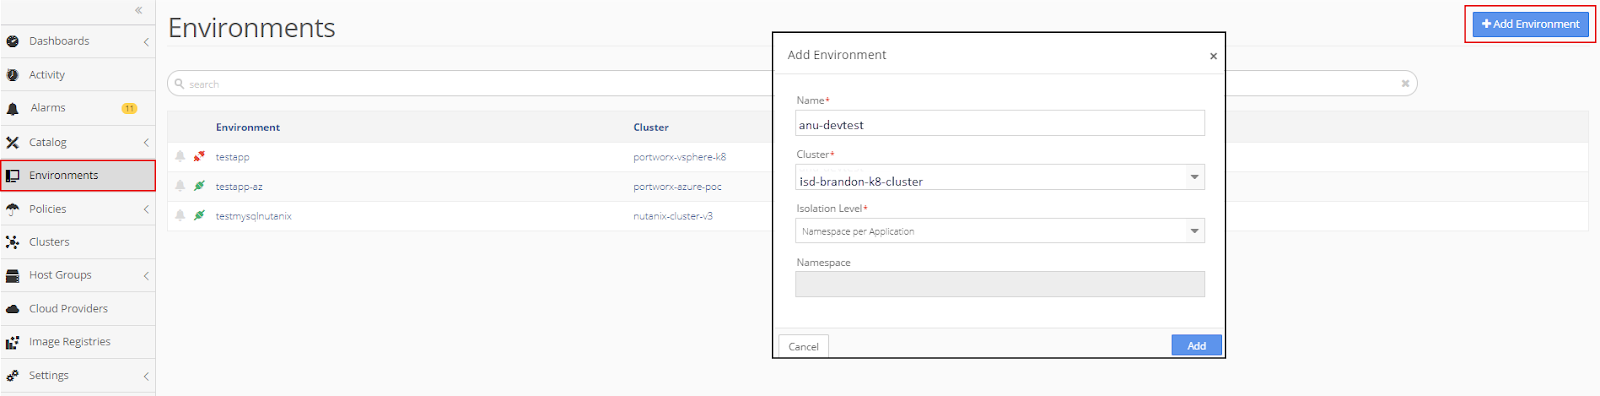
The new environment appears in the Environments menu.
In this example, a new mysql application is created and run in the new environment.
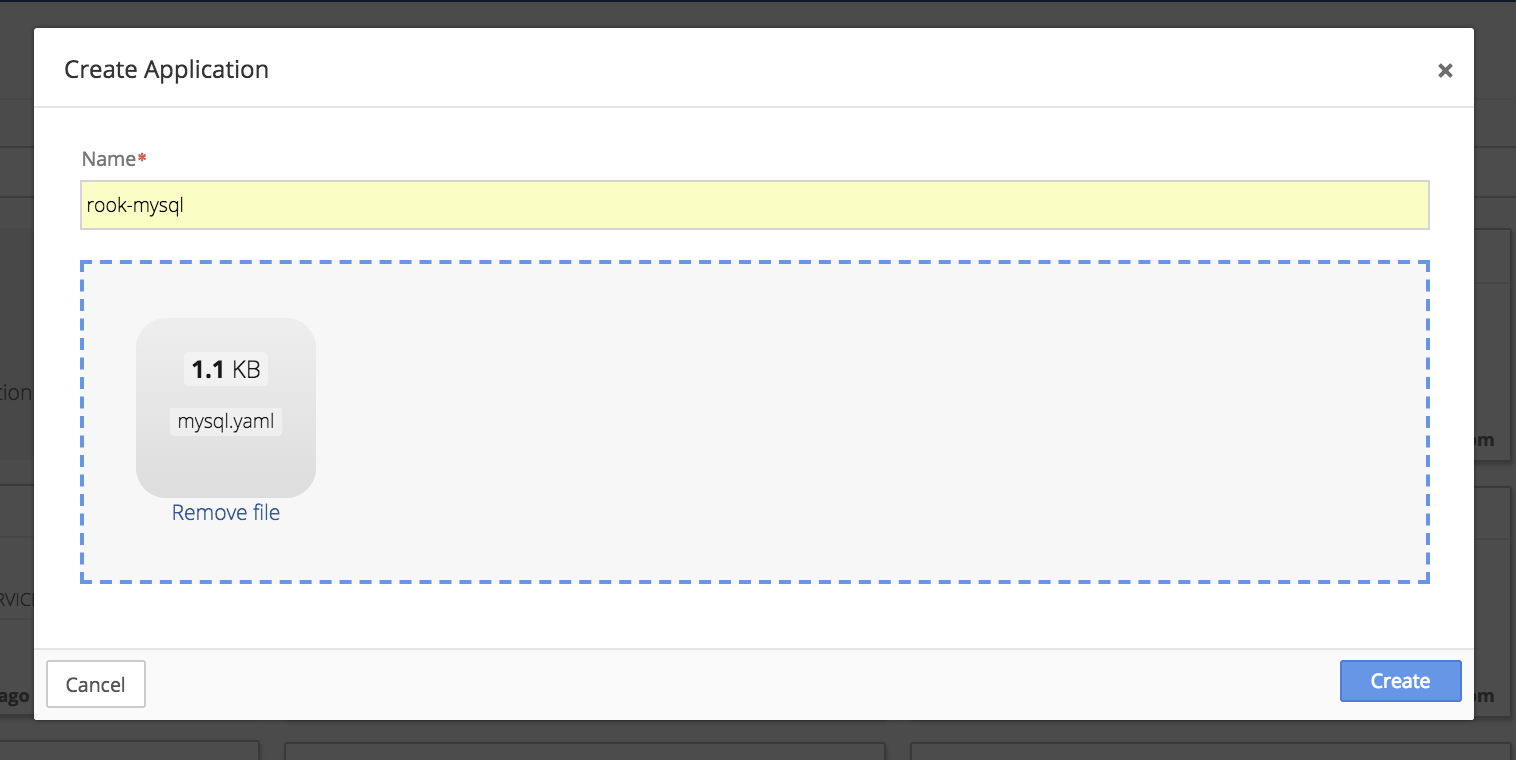
To create a new mysql Application, add the mysql YAML to the Application Catalog.
mysql YAML:
apiVersion: v1
kind: Service
metadata:
  name: wordpress-mysql
  labels:
    app: wordpress
spec:
  ports:
    - port: 3306
  selector:
    app: wordpress
    tier: mysql
  clusterIP: None
---
apiVersion: v1
kind: PersistentVolumeClaim
metadata:
  name: mysql-pv-claim
  labels:
    app: wordpress
spec:
  storageClassName: rook-ceph-block
  accessModes:
  - ReadWriteOnce
  resources:
    requests:
      storage: 20Gi
---
apiVersion: apps/v1beta1
kind: Deployment
metadata:
  name: wordpress-mysql
  labels:
    app: wordpress
spec:
  strategy:
    type: Recreate
  template:
    metadata:
      labels:
        app: wordpress
        tier: mysql
    spec:
      containers:
      - image: mysql:5.6
        name: mysql
        env:
        - name: MYSQL_ROOT_PASSWORD
          value: changeme
        ports:
        - containerPort: 3306
          name: mysql
        volumeMounts:
        - name: mysql-persistent-storage
          mountPath: /var/lib/rook
      volumes:
      - name: mysql-persistent-storage
        persistentVolumeClaim:
          claimName: mysql-pv-claim
To add the mysql YAML to the Application Catalog, click on Catalog in the sidebar menu and then select Application Catalog. From the main Application Catalog screen, click Add Application.
Drop the mysql YAML file into the upload box or select the file from the directory.
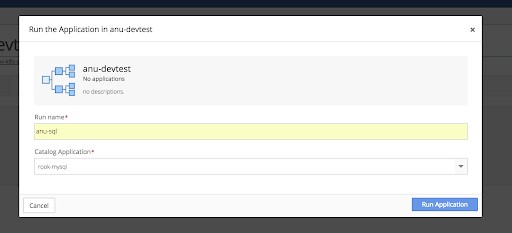
Run the mysql Application in the new Environment.
In the Environments menu, open the Environment that was just created. Click the gear in the top right corner of the Environments window and select the + Run an Application option.
Choose the mysql Application and click Run Application.
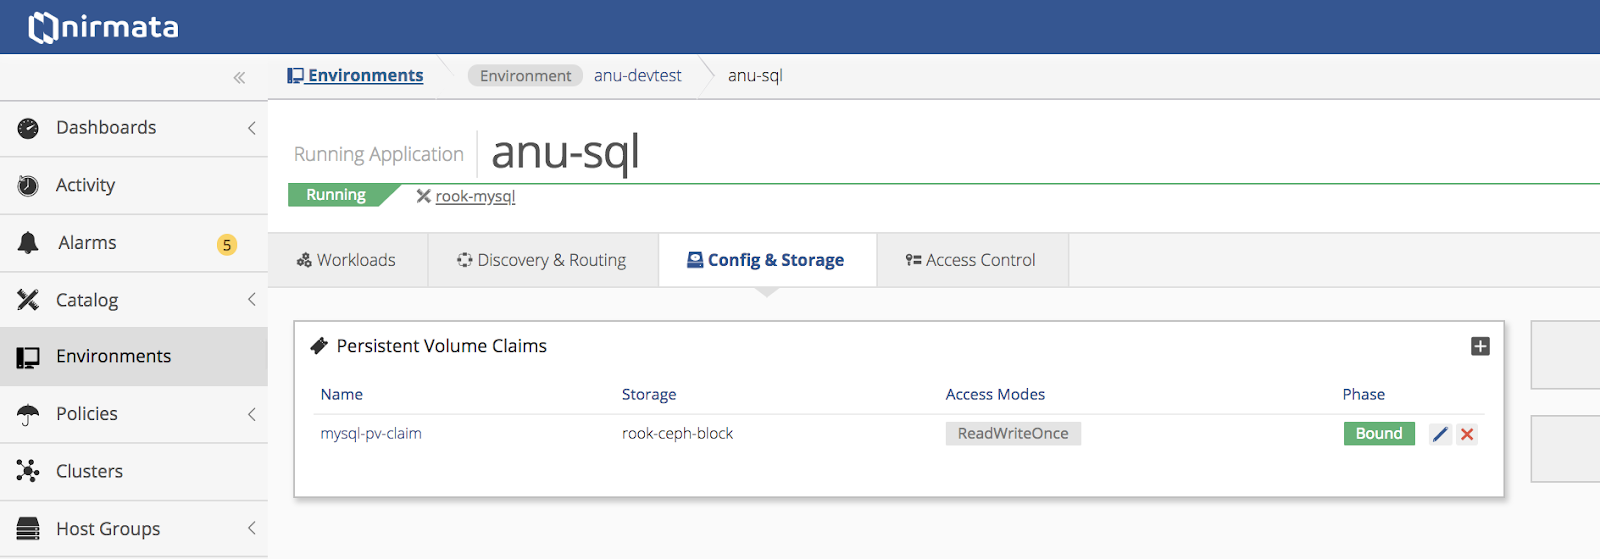
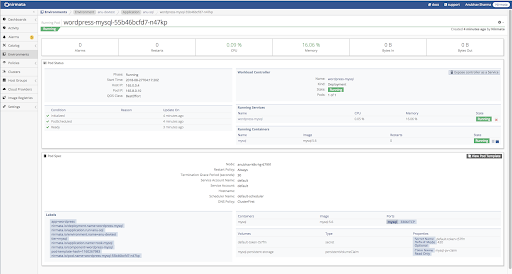
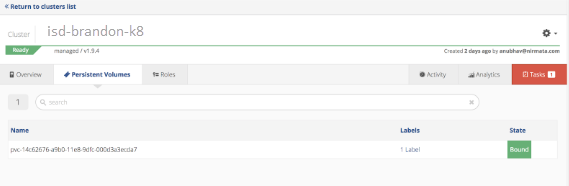
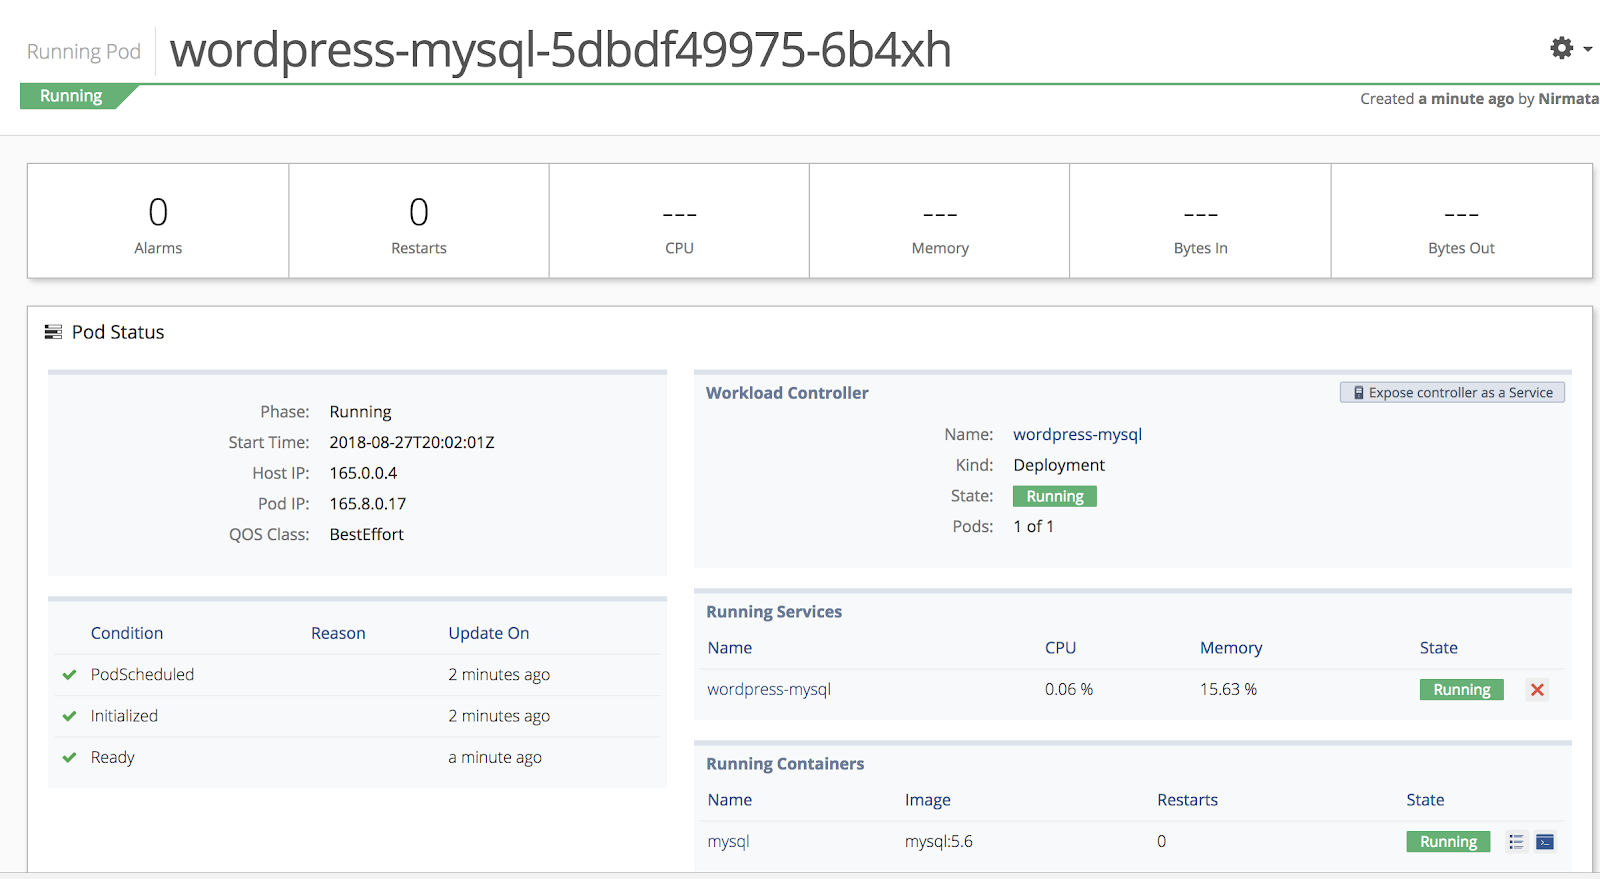
Verify that the Application is running using persistent volumes.
Verify workload status.
Verify persistent volume information.
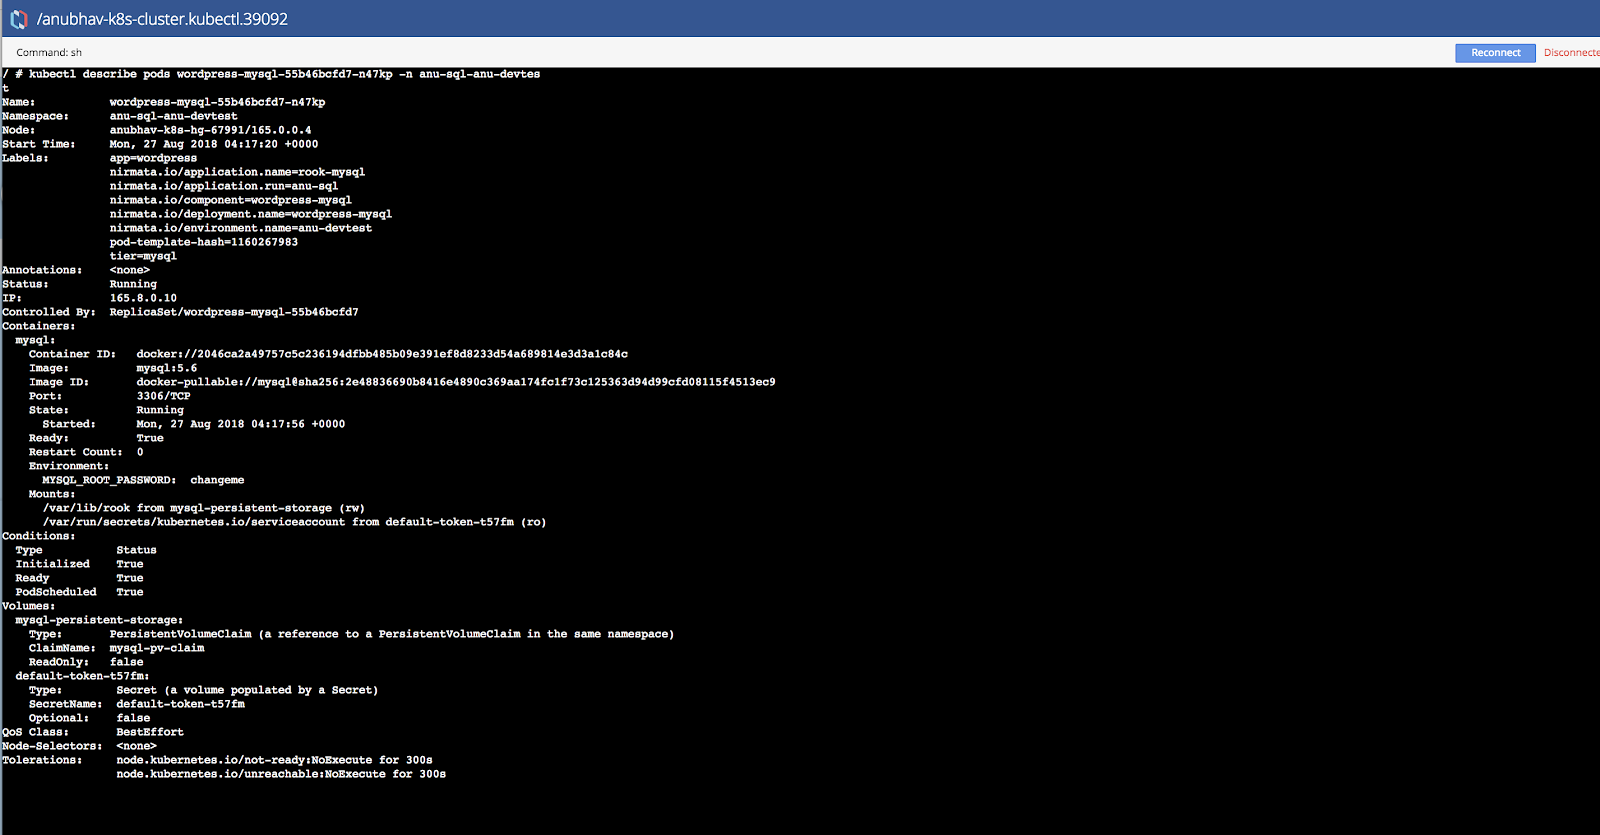
Verify pod status from Nirmata shell.
Verify Data Persistence Across Replication with Host Failure Scenario
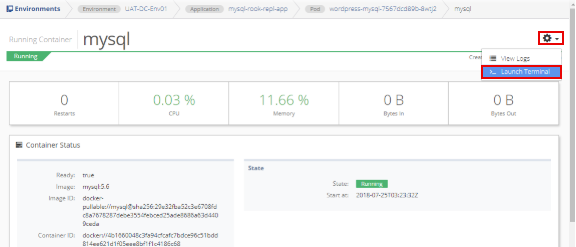
Open Environments from the sidebar menu and select the environment name, then the application name, and finally, the pod name.
From the Running Containers list, select the container name (mysql). Click the gear in the top right corner of the window and select the Launch Terminal option.
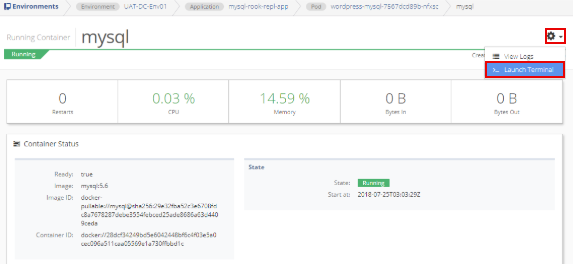
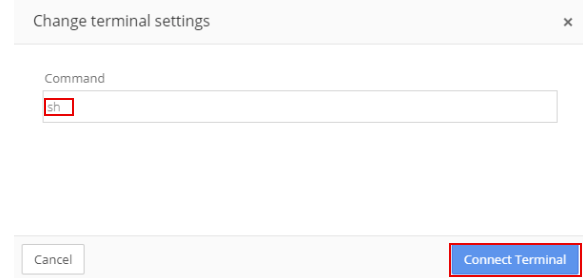
The displayed command is sh. Do not change the command. Select Connect Terminal.

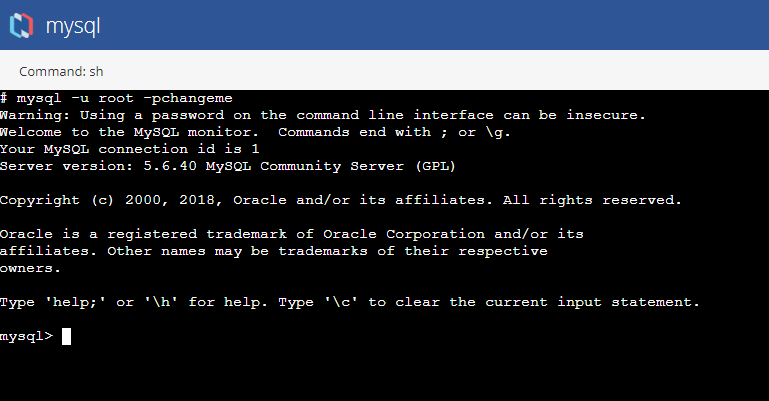
In the terminal window, enter the Connect to mysql Database as a Root User command.
mysql Command to Connect to Database as Root User:
mysql -u root -pchangeme

Create a new database by enter the new database command.
New Database Command:
mysql> create database testrook;`
The new database will display as:
Query OK, 1 row affected (0.00 sec)`
Verify the database was created by entering the Show Databases command.
Show Databases Command:
mysql> show databases;
If created, the new database is listed:
+---------------------+
| Database            |
+---------------------+
| information_schema  |
| #mysql50#lost+found |
| mysql               |
| performance_schema  |
| testrook            |
+---------------------+
5 rows in set (0.01 sec)
Connect to the new database using the Connect to Database command.
Connect to Database Command:
mysql> use testrook;
When connected, the following message will display:
Database changed
Create a new table in the database. Using the Create Table command.
Create Table Command:
mysql> create table employee (
    id INT AUTO_INCREMENT PRIMARY KEY,
    name varchar(20),
    dept varchar(10),
    salary int(10));
When the table is created, the following will display:
Query OK, 0 rows affected (0.12 sec)`
Insert few records in the new table using the Insert Records commands. After each record is added, a “Query OK” message will display.
Insert Records Commands:
mysql> insert into employee values(100,'Thomas','Sales',5000);
Query OK, 1 row affected (0.08 sec)
mysql> insert into employee values(200,'Jason','Technology',5500);
Query OK, 1 row affected (0.11 sec)
mysql> insert into employee values(300,'Mayla','Technology',7000);
Query OK, 1 row affected (0.06 sec)
mysql> insert into employee values(400,'Nisha','Marketing',9500);
Query OK, 1 row affected (0.05 sec)
mysql> ;
Query OK, 1 row affected (0.05 sec)
Verify that the records are displayed in the table by using the View Table command.
View Table Command:
mysql> select * from employee;
In this example, the following table will display:
+-----+--------+------------+--------+
| id  | name   | dept       | salary |
+-----+--------+------------+--------+
| 100 | Thomas | Sales      |   5000 |
| 200 | Jason  | Technology |   5500 |
| 300 | Mayla  | Technology |   7000 |
| 400 | Nisha  | Marketing  |   9500 |
| 500 | Randy  | Technology |   6000 |
+-----+--------+------------+--------+
5 rows in set (0.00 sec)
Exit from mysql and terminal using the Exit command.
Exit Command:
mysql> exit
Disable the Host Running the Current Pod
This function is only available to admin users.
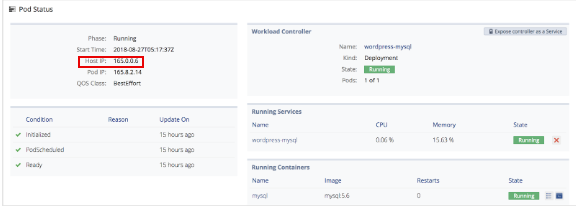
To disable the host running the current pod, locate the host running the pod. Select Environments from the sidebar menu, then the environment name, application name, and finally, the pod name.
Note: The Host IP is listed under Pod Status.
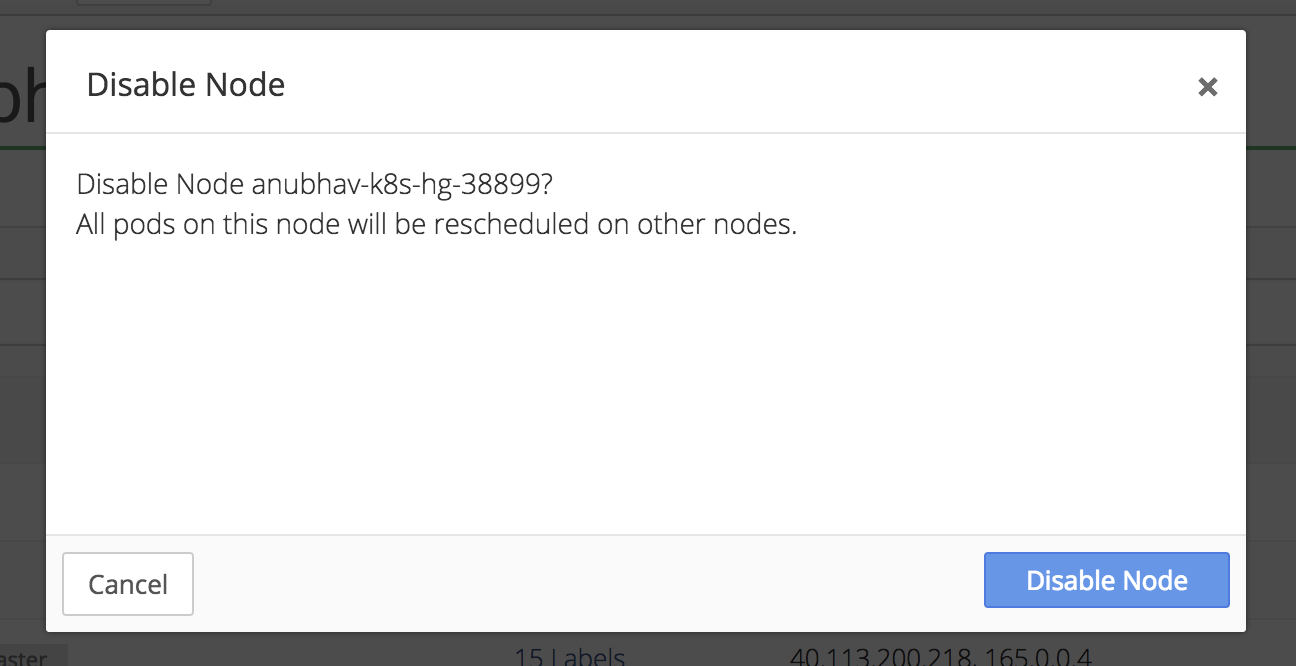
Select Clusters from the sidebar menu and the the cluster name. In the Node box, click View Details. Then click the gear icon next to the host running the pod and select Disable Node.
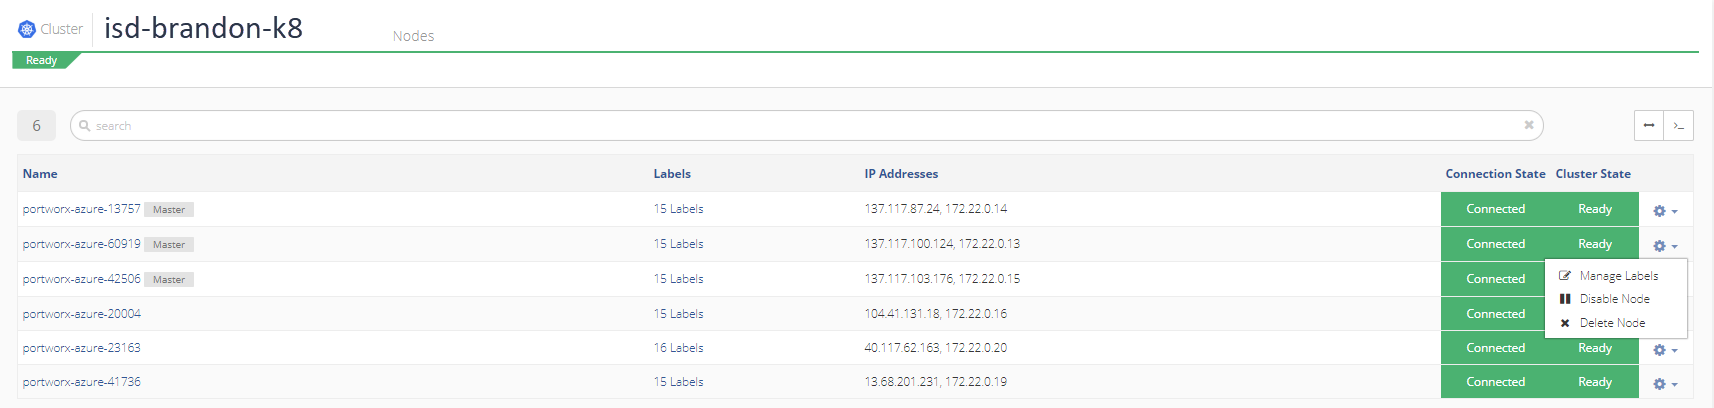
Click Disable Node to confirm.
Verify Data in the New Pod
When a node is disabled on the original pod, Kubernetes reschedules the pod on another, available host in the cluster and assigns the pod a new name.
To verify the data in the rescheduled and renamed pod, select Environments from the sidebar menu and open the environment and application. Then select the pod name.
Next, login to the mysql database. Select Environments from the sidebar menu and open the environment, application, and pod. Select mysql from the Running Containers list. Click gear icon in the top right corner and select Launch Terminal.
The displayed command is sh. Do not change the command. Select Connect Terminal.
In the terminal window, enter the Connect to mysql Database as a Root User command.
mysql Command to Connect to Database as Root User:
mysql -u root -pchangeme
Verify the ‘testrook’ database by entering the Show Databases command.
Show Databases Command:
mysql> show databases;
The following will display:
+---------------------+
| Database            |
+---------------------+
| information_schema  |
| #mysql50#lost+found |
| mysql               |
| performance_schema  |
| testrook            |
+---------------------+
5 rows in set (0.01 sec)
Connect to the testrook database by using the Connect to testrook Database command.
Connect to testrook Database Command:
mysql> use testrook;
When connected, the following message will display:
Reading table information for completion of table and column names
You can turn off this feature to get a quicker startup with -A

Database changed
Verify the records in the table by using the View Table command.
View Table Command:
mysql> select * from employee;
The following table will display:
+-----+--------+------------+--------+
| id  | name   | dept       | salary |
+-----+--------+------------+--------+
| 100 | Thomas | Sales      |   5000 |
| 200 | Jason  | Technology |   5500 |
| 300 | Mayla  | Technology |   7000 |
| 400 | Nisha  | Marketing  |   9500 |
| 500 | Randy  | Technology |   6000 |
+-----+--------+------------+--------+
5 rows in set (0.00 sec)
Exit from mysql and terminal using the Exit command.
Exit Command:
mysql> exit