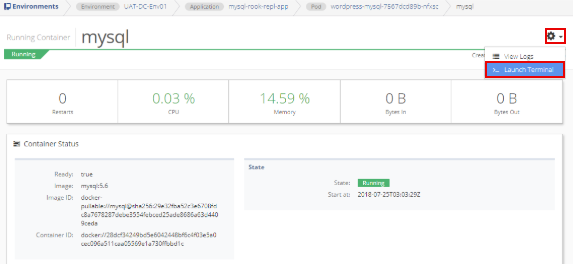
Open Environments from the sidebar menu and select the environment name, then the application name, and finally, the pod name.
From the Running Containers list, select the container name (mysql). Click the gear in the top right corner of the window and select the Launch Terminal option.
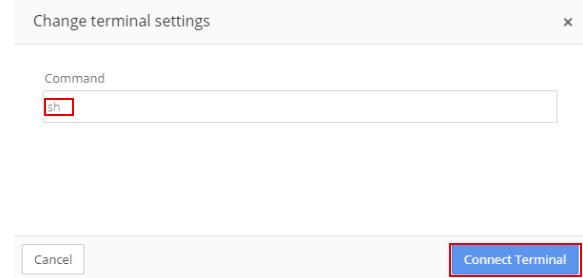
The displayed command is sh. Do not change the command. Select Connect Terminal.
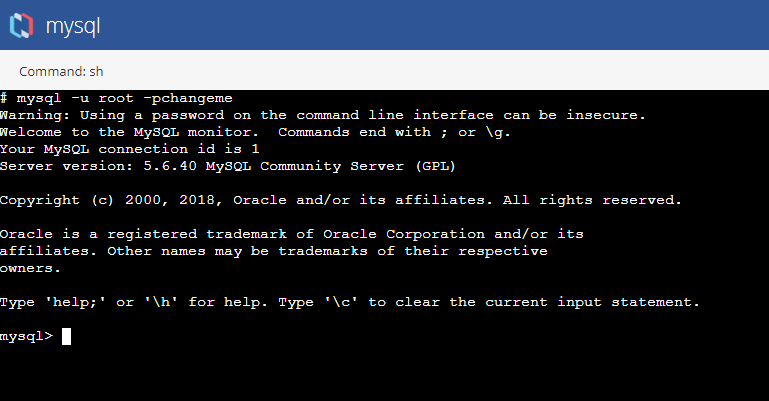
In the terminal window, enter the Connect to mysql Database as a Root User command.
mysql Command to Connect to Database as Root User:
mysql -u root -pchangeme
Create a new database by enter the new database command.
New Database Command:
mysql> create database testrook;`
The new database will display as:
Query OK, 1 row affected (0.00 sec)`
Verify the database was created by entering the Show Databases command.
Show Databases Command:
mysql> show databases;
If created, the new database is listed:
+---------------------+
| Database            |
+---------------------+
| information_schema  |
| #mysql50#lost+found |
| mysql               |
| performance_schema  |
| testrook            |
+---------------------+
5 rows in set (0.01 sec)
Connect to the new database using the Connect to Database command.
Connect to Database Command:
mysql> use testrook;
When connected, the following message will display:
Database changed
Create a new table in the database. Using the Create Table command.
Create Table Command:
mysql> create table employee (
    id INT AUTO_INCREMENT PRIMARY KEY,
    name varchar(20),
    dept varchar(10),
    salary int(10));
When the table is created, the following will display:
Query OK, 0 rows affected (0.12 sec)`
Insert few records in the new table using the Insert Records commands. After each record is added, a �Query OK� message will display.
Insert Records Commands:
mysql> insert into employee values(100,'Thomas','Sales',5000);
Query OK, 1 row affected (0.08 sec)
mysql> insert into employee values(200,'Jason','Technology',5500);
Query OK, 1 row affected (0.11 sec)
mysql> insert into employee values(300,'Mayla','Technology',7000);
Query OK, 1 row affected (0.06 sec)
mysql> insert into employee values(400,'Nisha','Marketing',9500);
Query OK, 1 row affected (0.05 sec)
mysql> ;
Query OK, 1 row affected (0.05 sec)
Verify that the records are displayed in the table by using the View Table command.
View Table Command:
mysql> select * from employee;
In this example, the following table will display:
+-----+--------+------------+--------+
| id  | name   | dept       | salary |
+-----+--------+------------+--------+
| 100 | Thomas | Sales      |   5000 |
| 200 | Jason  | Technology |   5500 |
| 300 | Mayla  | Technology |   7000 |
| 400 | Nisha  | Marketing  |   9500 |
| 500 | Randy  | Technology |   6000 |
+-----+--------+------------+--------+
5 rows in set (0.00 sec)
Exit from mysql and terminal using the Exit command.
Exit Command:
mysql> exit